How to Combine Four 1080 Quadrant Videos Into 4K IN Final Cut Pro X
One question we got asked recently was how to combine four 1080 videos that had been shot in 'quadrants of 4k' into a full 4K (or more accurately) a UHD video clip using Final Cut Pro X. After some trials, we think we have come up with the best method. This is because some cameras and post production equipment record and playback in 1080 segments.
So presented with four 1080 quadrants, how do we go about about building them into a single 4K (3840x2160 UHD) video?
We immediately thought of using a multicam technique, but as a Multicam Clip can only display one video image and one audio source at a time, this wasn't going to work. Piling them up as Connected Clips on a timeline using one of our Shrinkback plugins from the XEffects Toolkit would work, but we don't want to run the clips through Motion. We want to keep everything as fast as we can and locked pixel for pixel. Having stacked connected clips would also make trimming cumbersome and slow.
Building a custom Synchronised Clip was the answer.
Let's take a look at the process:
First of all import the media into your event. Fairly obvious that every 4K (UHD) end movie will require four 1080 videos. As you can see we renamed and numbered the clips after import to 1 Top Left through to 4 Bottom Right. This isn't essential as it is fairly easy to work out from the quadrant videos what goes where.

We then need to make a Synchronised Clip. Select all the four quadrant videos and then right click Synchronise Clips or ⌥⌘G if you like shortcuts. You will get the same result.

You should see the option box at the top of the frame. A few things you need to check here after you've named the clip. This will be the actual name of the 4K clip that will appear in the browser and named on the timeline, so make it something you'll remember or fit it into a naming scheme.
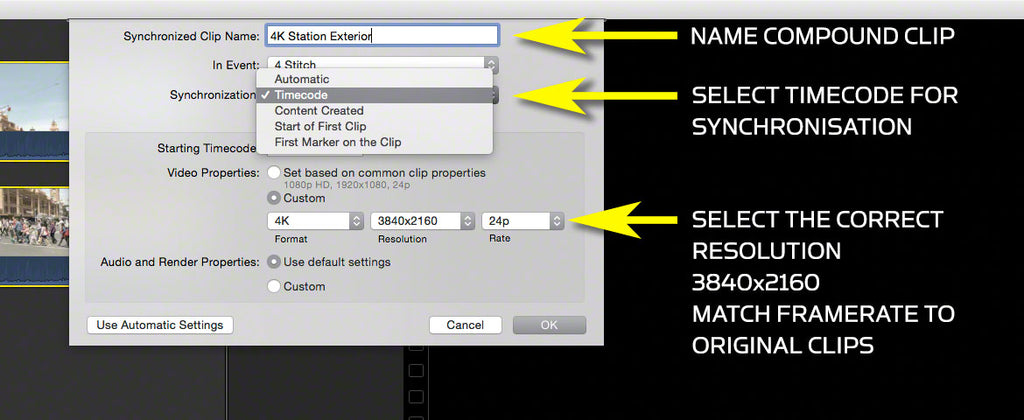
Selecting the Timecode for synchronisation is the easiest way to sync the clips if they have come from a broadcast server recording or indeed a camera that records in quadrants. If the clips are of unequal length then they can be synched up manually by lining up a marker placed on sync points on all clips. If there is audio on all angles, that can be used if timecode doesn't work for you. Sync can be adjusted at any time once the new clip has been made.
The video properties need to be set to 4K UHD 3840 x 2160 as this is double the vertical and horizontal resolution of a traditional 1920 x 1080 HD frame. You will then be able to get four HD video clips in a single Synchronised Clip, pixel for pixel.
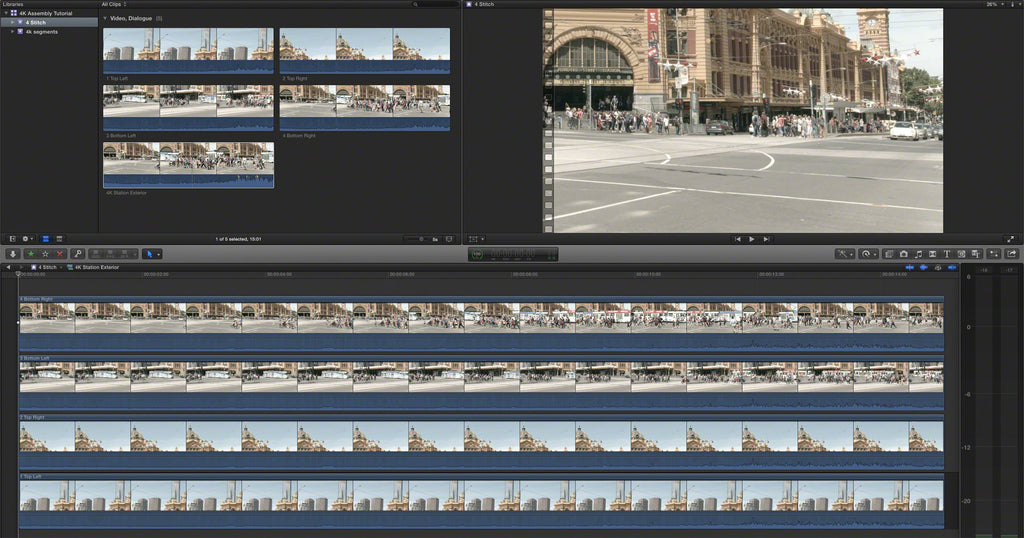
After checking your settings, click OK and this will build a synchronised clip and place it into the browser. Find your named synchronised clip, right click and Open in Timeline.

This will show the four quadrant clips in the synchronised clip stacked one on top of the other. You'll notice that the top clip has been blown up to fill the frame, this is not what we want. Actually all the clips are the same size, the top clip covers the other three.
To get the clips to the correct size, fist of all select all of the four clips on the timeline of the synchronised clip. Then open up the Inspector (⌘4) you will notice that at the top it should say that 4 items are being inspected. You can do this operation one clip at a time, but this way does it with one click.
Scroll down to the Spatial Conform section and set the type to None from the default Fit. You should see all the clips shrink down to their actual size, a quarter of the UHD frame. They will also be centred one on top of the other.

Here comes the maths, well not really maths, just moving the clips into the right position to make the full UHD frame up.
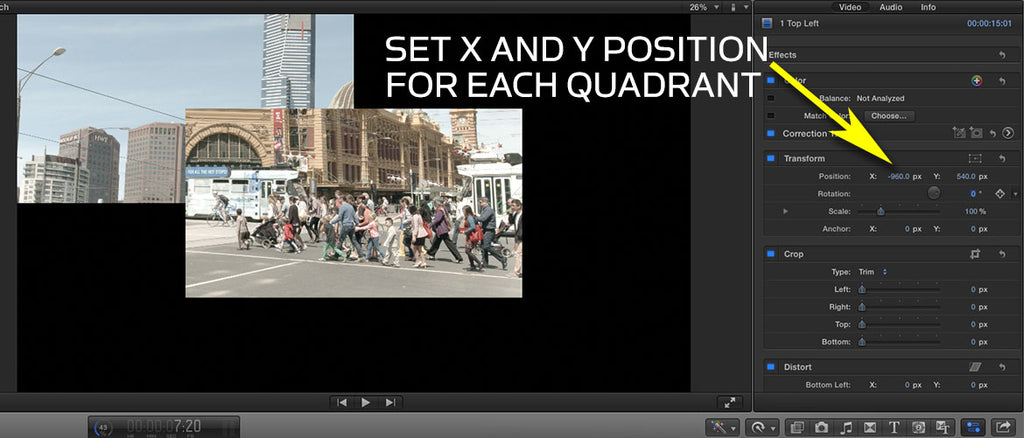
Select the clips one by one and move them in the inspector by typing in the amount of pixels moved left on the X axis (a minus number), or right, and on the Y axis up, or down (a minus number.)
Top Left X -960 Y 540
Top Right X 960 Y 540
Bottom Left X -960 Y -540
Bottom Right X 960 Y -540
Setting the first quadrant, Top Left.
The third Bottom Left.
 Finishing up with the bottom right. It doesn't really matter which order you do the moves, just use the correct pixel offsets.

One trick here whilst still in the opened timeline of the synchronised clip is to toggle off the audio that you don't need. Building up a reverse quad split like this uses four 1080 video clips and that will give four times the audio too. Work out which audio you want to keep, select the other three video clips then disable their audio in the Inspector.

Another quick tip here. You can make a Smart Collection (⌘⌥N) and set the type to Synchronized. This will put all the 4k synchronised clips under one keyword. Here you can see we have labeled the collection '4K Compounds.' Maybe that should have been 4k Synchronised!

On to the editing and we need to create a new Project (⌘N) with the correct dimensions, which of course are 3840 x 2160. The framerate should match your original footage again.

Yes we love dark mode!

All that is left to do is to start editing with the UHD synchronised clip. Bear in mind you will be accessing 4 x 1080 video clips off a drive at the same time, so things might slow down if your storage isn't fast enough. You can always export the synchronised clip as a self contained movie to cut down on the drive access or if you need to return the combined clip back to a server for playout & distribution.
A synchronised clip behaves like any other clip in the browser or timeline. In the example below we have applied a 300% speed increase with ramps either end. This would return super slowmotion back to realtime and back again with speed ramps. Clever eh?

Leave a comment
Comments will be approved before showing up.
Also in Tutorials

Rough Graphic to Finished Final Cut Pro Template in Under 5 Minutes Using AI!
Take a simple network diagram example and transform it into a professional Final Cut Pro template. We'll follow a straightforward workflow that anyone can replicate.

AI Just Unlocked a NEW WAY to Colour Grade (Mind Blown!)
We explore how AI can automatically create custom LUTs (.cube files) for professional-grade color grading.

Get Final Cut Pro Sequence Data Into Google Sheets Using AI
How to extract all your Final Cut Pro project data into a spreadsheet. This is incredibly useful for project management, creating edit decision lists, or just keeping track of your media.